Placeholders
Overview
Placeholders are empty custom tags that reserve space for dynamic content that is inserted when a Web page is requested. For example, the markup:
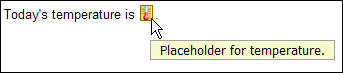
Today's temperature is <temperature />.
...gives this result when the placeholder is replaced by the current temperate:
Today's temperature is 23°C.
In the editor's WYSIWYG mode, placeholders display by default as  icons. If the placeholder has a
 title attribute, its value will display as a tooltip when the cursor is placed over the icon.
Custom icons such as the one seen below can be assigned or mapped to placeholders via the placeholders.xml file.
The placeholders.xml file is referenced via the "Placeholders" <param> tag. For example:
<param name="Placeholders" value="http://yourserver/placeholders.xml" />
The following is an example of a placeholders.xml file that maps to a custom icon:
<placeholders><placeholder><elt>temperature</elt><icon>thermometer</icon></placeholder></placeholders>
In the example above, the <placeholders> tag is a root element and contains one or more <placeholder> elements. The <placeholder> element defines the rules for matching an icon to a custom tag. The <elt> tag contains the name of the custom tag. The <icon> element contains the ID of an icon defined in the icons.xml file, or it can contain the HEX value of a GIF file.
You can assign icons to placeholders based on the element name combined with the value of its attributes. For example, you might want the placeholder  to display in the editor when the
 type attribute value is "happy", and the  placeholder to display when the
 type attribute value is "sad":
<emoticon type="some value" />
In th example below, use the <attr> elemement within the <placeholder> element to define the attribute to match on. The <name> element is the name of the attribute and the <value> element contains the value of the attribute. For example:
<placeholders><placeholder><elt>emoticon</elt><attr><name>type</name><value>happy</value></attr><icon>emoticon-happy</icon></placeholder><placeholder><elt>emoticon</elt><attr><name>type</name><value>sad</value></attr><icon>emoticon-sad</icon></placeholder></placeholders>
Inserting Placeholders
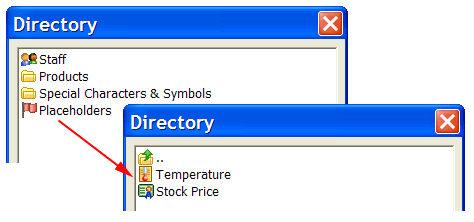
The easiest way for non-technical uses to insert placeholders is through the Directory service ( on the toolbar). The screenshot belows shows the user browsing the Placeholders folder for appropriate placeholders.
Configuring XStandard To Preview Dynamic Content
The editor's Browser Preview mode is the result of taking content entered into the editor and running it through an XSLT. A copy of this XSLT file can be found in "C:\Program Files\XStandard\preview.xsl" on Windows and in "/Applications/XStandard/preview.xsl" on OS X. The editor references this file via the "PreviewXSLT" <param> tag. For example:
<param name="PreviewXSLT" value="http://myserver/preview.xsl" />
The XSLT can be customized to replace placeholders with dynamically generated content, so that the results can are seen in Browser Preview mode. For example, say we want to implement a document include capability in the editor. The following placeholder can be used to identify the document fragment to be included:
<include document="ABC123" />
In order to display the contents of the inlcuded document fragment in Browser Preview mode, we can add the following rule to the XSLT:
<xsl:template match="include"><xsl:variable name="url">http://yourserver/document.asp?id=<xsl:value-of select="@document"/></xsl:variable><xsl:apply-templates select="document($url)/*" /></xsl:template>
This rule states that when the <include> element is encountered, take the value from the document attribute and pass it in the query string to URL http://yourserver/document.asp?id=xxx. Then display the data returned from this URL. Note, the data returned must be a valid XHTML (XML) document fragment with a root element. Use a <span> tag as a root element if the contents are all inline elements. For example:
<span>The stock price of <abbr>IBM</abbr> is $123.15.</span>
Use a <div> tag as a root element if the contents contain a block element. For example:
<div><p>...</p><table>...</table><p>...</p></div>
Since placeholders are treated as inline elements by the editor, a placeholder will likely be inside a <p> tag. Add the following rule to the XSLT that will convert the <p> tag that contains a placeholder, such as <include>, into a <div> tag.
<xsl:template match="p[include]"><div><xsl:apply-templates/></div></xsl:template>